
Hexo | 基础配置 | Butterfly主题安装 | 文章发布 | 保姆级教程
Hexo Butterfly 主题安装与基础配置操作教程
🎬 视频教程
🌟前提条件:
- ✅ 已部署 Hexo 项目
- 🔗 安装教程参考:Hexo站点搭建 | GitHub部署 | Cloudflare Pages发布 | 保姆级教程
🎨 安装 Butterfly 主题
🔽 下载主题(推荐方式:Git 克隆)
国内用户建议使用 Gitee:
1 | git clone -b master https://gitee.com/immyw/hexo-theme-butterfly.git themes/butterfly |
网络环境较好可使用 GitHub:
1 | git clone -b master https://github.com/jerryc127/hexo-theme-butterfly.git themes/butterfly |
⚙️ 应用主题
修改 Hexo 根目录下的 _config.yml:
1 | theme: butterfly |
📦 安装依赖插件
如果未安装 pug 与 stylus 渲染器,请执行:
1 | npm install hexo-renderer-pug hexo-renderer-stylus --save |
📁 配置建议(可选)
为了减少时间上维护或主题升级引起的混乱,建议使用外部配置文件管理主题配置:
- 在 Hexo 根目录创建文件
_config.butterfly.yml - 将
themes/butterfly/_config.yml中所有内容复制到该文件
运行以下命令来快捷操作
1 | copy "themes\butterfly\_config.yml" "_config.butterfly.yml" |
🌟 子模块配置
1. 创建 .gitmodules 文件
运行创建命令:
1 | echo. > .gitmodules |
编辑 .gitmodules 文件,添加以下内容,确保路径和 URL 正确:
1 | [submodule "themes/butterfly"] |
2. 添加 .gitmodules 文件到版本控制
1 | git add .gitmodules |
3. 初始化和更新子模块
初始化和更新子模块:
1 | git submodule init # 初始化子模块 |
4. 检查子模块状态
确认子模块是否正确同步:
1 | git submodule status |
5. 推送到远程仓库
将子模块变更推送到远程仓库:
1 | git add themes/butterfly |
🛠️ 基础配置
Hexo 全局配置文件:
_config.yml
官方文档:https://hexo.io/zh-cn/docs/configurationButterfly 主题配置文件:
_config.butterfly.yml
官方文档:https://butterfly.js.org/
✍️ 文章发布说明
✅ 推荐编辑器
Hexo 默认使用 Markdown 格式撰写文章,推荐使用以下编辑器:
安装包我已上传至云盘,可自取:云盘传送
🔧 创建与编辑文章
- 打开终端,进入 Hexo 项目根目录
- 创建文章:
1 | hexo new "posts" # 创建一篇文章 posts.md |
文章文件会生成在 /source/_posts/ 目录下
- 使用 Markdown 编辑器打开 posts.md,编写文章内容
💡 小技巧:可以先在 Word 或 TXT 中撰写内容,再使用 AI(如 DeepSeek)转换为 Markdown 格式,粘贴进 Hexo 文章中。
🚀 发布文章
依次执行以下命令:
1 | hexo generate # 生成静态文件 |
等待上传成功后,刷新站点即可看到文章上线。
本博客所有文章除特别声明外,均采用 CC BY-NC-SA 4.0 许可协议。转载请注明来源 Newbie Village!

相关推荐
2025-04-11
Hexo站点搭建 | GitHub部署 | Cloudflare Pages发布 | 保姆级教程
🚀 Hexo 博客部署到 GitHub + Cloudflare Pages 完整指南🎬 视频教程 BiliBili:Hexo站点搭建 | GitHub部署 | Cloudflare Pages发布 | 保姆级教程 YouTube:Hexo站点搭建 | GitHub部署 | Cloudflare Pages发布 | 保姆级教程 ⚠️ 小提示: 🐢 Node.js、Git 安装包官方下载可能较慢,建议使用代理加速下载,或前往本站云盘获取安装包 ☁️ 博客云盘传送 🛡️ GitHub 国内访问可能不稳定,建议全程使用代理网络进行部署 🛰 推荐自用机场(稳定高效)👉 注册传送 🧧 九折优惠码:like10 1. 安装依赖环境✅ 安装 Node.js建议安装稳定版(LTS)版本:Node.js 官网 ✅ 安装 Git下载地址:Git 官网 💡 提示:安装 Git 时,在选择主干分支名称(default branch name)阶段,建议将默认的 master 修改为 main,以便后续与 GitHub...

2025-05-29
一分钟搭建属于你自己的在线影视站:LibreTV 部署指南
⭐️ 一分钟搭建属于你自己的在线影视站:LibreTV 部署指南快速部署 · 密码保护 · 多平台支持你是否曾想过拥有一个属于自己的在线影视站?今天推荐一个开源项目:LibreTV,它让你只需一分钟就能部署一个影视站点,并支持多种部署方式:GitHub + Cloudflare、Vercel、Docker 等,无需处理处理备置环境,还支持密码保护,保护你的私人站点不被随意访问。 🔻效果预览:📺 在线预览地址 🎬 视频教程 BiliBili:一分钟搭建属于你自己的在线影视站:LibreTV 部署指南 YouTube:一分钟搭建属于你自己的在线影视站:LibreTV 部署指南 🔧 部署方式一:GitHub + Cloudflare Pages(推荐) 优点:免费、稳定、国内访问速度好。 步骤: Fork 仓库前往 LibreTV 的 GitHub 仓库:https://github.com/LibreSpark/LibreTV点击右上角 Fork,复制到你的账户下。 配置 Cloudflare Pages 登录 Cloudflare...
2025-07-17
BinNav - 自定义导航页(可视化后台管理)
🚀 BinNav - 自定义导航(可视化后台管理)一个现代化的网站导航页面,发现优质网站,提升工作效率。支持可视化管理后台、智能图标获取、拖拽排序和自动部署更新。 ✨ 核心特性现代化设计 响应式布局,完美适配桌面端和移动端 毛玻璃效果和流畅动画 支持分类图标和网站图标自动获取 优雅的卡片式布局 强大的管理后台 网站管理 - 添加、编辑、删除网站,支持拖拽排序 分类管理 - 创建多级分类,自定义图标和排序 智能图标 - 自动获取网站图标,支持多种回退方案 待审核管理 - 用户提交的网站统一审核 系统设置 - 站点信息、Logo、备案信息配置 自动化部署 一键保存到GitHub,触发自动部署 EdgeOne Functions API,响应速度快80% 支持配置文件本地备份下载 无需手动操作,保存即生效 智能搜索 站内搜索,快速定位网站 支持按分类筛选浏览 响应式侧边栏导航 🌐 在线预览🔗 查看演示站点 开源项目地址: 🔗BinNav_Public当前版本 V1.0.0🎬 视频教程 YouTube:BinNav - 自定义导航页(可视化后台管理)

2025-05-08
ClawCloud | 免费VPS主机 | 无需绑卡 | WP&AList一键部署 | 新手推荐
🚀 ClawCloud 免费计划 & 快速上手指南(2025 最新)如果你正在寻找一个一站式的云部署平台,ClawCloud 是一款非常值得关注的工具。它不仅支持容器化部署,还集成了数据库、对象存储、开发主机、应用商店等多种服务,最关键的是:——免费额度非常慷慨,尤其适合个人开发者和轻量项目使用。 🎬 视频教程 BiliBili:已下架 YouTube:ClawCloud | 免费VPS主机 | 无需绑卡 | WP&AList一键部署 | 新手推荐 🆓 免费计划一览ClawCloud 面向所有用户推出免费资源计划,并为老 GitHub 用户提供额外加成: 注册即送 $5 美元:所有新用户在首月即可获得,无需信用卡。 GitHub 账号加成(重点): GitHub 账号注册时间超过 180 天,系统自动判定; 每月额外获得 $5 美元赠送额度(Gift Credits); 与是否付费无关,免费或付费计划用户均可享受。 ✅ 使用 GitHub 老账号注册,即可长期每月百拾 $5! 💻 免费资源配额说明 最多可使用资源: 4 核...
2025-06-20
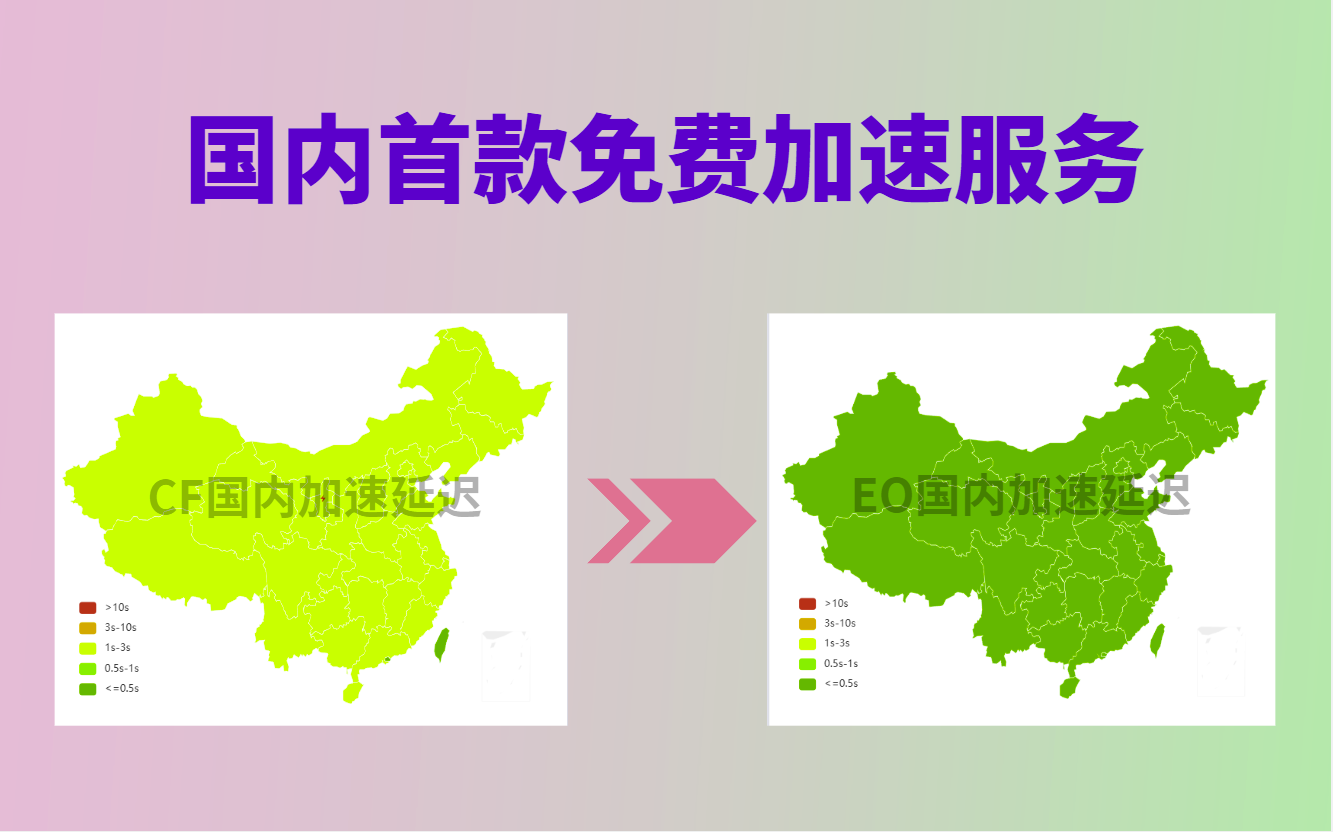
国内永久免费全球加速访问方案 | 优于CF加速 | 无需实名| 无需信用卡 | EdgeOne
🚀 全面了解 EdgeOne:免费的全球 CDN 与国内加速方案🎬 视频教程 YouTube:国内永久免费全球加速访问方案 | 优于CF加速 | 无需实名| 无需信用卡 | EdgeOne 简介:什么是 EdgeOne?EdgeOne 是腾讯云推出的全球智能边缘加速平台,旨在通过高性能的边缘节点网络,为网站、应用、小程序等提供一体化的全链路加速、安全防护、智能调度等服务。 EdgeOne 核心优势 全球加速,含中国大陆添加站点后,EdgeOne 可为全球访问提供智能边缘加速;如域名已备案,还可启用中国大陆加速,真正实现全球全境提速。 多种网页部署方式,快速上线EdgeOne Pages 支持三种接入方式: ✅ GitHub 仓库导入(支持自动部署) ✅ 官方模板一键创建(零基础可用) ✅ 本地项目文件上传(自由掌控结构) 邮箱注册即用,无需绑定信用卡用户只需通过邮箱注册即可开始使用 EdgeOne,无需信用卡或繁杂的身份验证,适合开发者、博主或初创团队快速试水。 ✉️ 快速开始:邮箱注册即用EdgeOne...

2025-07-12
EdgeOne 使用进阶教程 | 免费兑换码 | 站点加速配置
🚀 EdgeOne 使用进阶教程🎬 视频教程 YouTube:EdgeOne 使用进阶教程 | 免费兑换码 | 站点加速配置 一、免费套餐兑换码获取方式EdgeOne 提供多种方式获取免费套餐兑换码,适用于站点加速与安全防护体验。 活动链接:点击参与 ✅ 方式一:在 X(原推特)平台推广 发布一条推广推文,内容围绕 EdgeOne 使用体验或推荐。 必须包含以下要素: 话题标签:#EdgeOneFreePlan 提及官方账号:@TencentCloudEO 发布推文:点击发布 推文示例: 1使用 EdgeOne 免费 CDN 加速全球站点!#EdgeOneFreePlan @TencentCloudEO https://edgeone.ai/redemption?from=recommend 发放时间:工作日(周一至周五)11:00–20:00(UTC+8) 数量说明:每日限量发放 100 个兑换码,优质内容优先获取。 ✅ 方式二:加入 Discord 活动赢取兑换码 加入官方 Discord...
公告